(最終更新月:2021年11月)
✔当記事は以下のような方に向けて書かれています
「DjangoでCSSファイルを読み込むにはどうするの?」
「独自CSSでフッターを作ってみたい!」
✔当記事を通じてお伝えすること
- DjangoにおけるCSSファイルの設定・読み込む方法
- フッターのサンプル
フッターは、ページの最下部に配置され、ナビゲーションバーで貼られているリンクやプライバシーポリシー、お問い合わせ、などへのリンクが張られている場合が多いです

(参考:Django公式サイトより)
当記事ではシンプルですがこのようなフッターを作っていきます。

CSSファイルの保存場所:settings.pyで確認
✔settings.py > STATICFILES_DIRS
STATICFILES_DIRS = [BASE_DIR / "static_local" ]記述がない場合は、settings.pyへ追記します。
フォルダ名はお好きなもので構いませんが、CSSファイルなどをそのフォルダの中に作成していくのでわかりやすい方が良いです。
私の場合は、static_local > cssとフォルダが続き、その中に「footer.css」を作成しました。
src #プロジェクトフォルダ
├── ...
 .
 .
├── ...
├── static_local
│   └── css
│       └── footer.css
└── ...
STATICフォルダに入れたCSSファイルを読み込む方法
通常、CSSを読み込む際は、以下のとおりとするのが一般的です。
<link rel=”stylesheet” href=”ファイルパス”>
Djangoでは少し特殊な方法を使います。
ポイントはこちら。
- {% load static %}でstatic設定を読み込みこと
- link先として、{% static ‘static_local以下のパス’ %}を指定すること
具体的に今回の例でみていくと、
<!doctype html>
<html lang="ja">
  <head>
    ....
    {% load static %}
    <link rel="stylesheet" href="{% static 'css/footer.css' %}">
    ....
  </head>
  <body>
    .....
  </body>
</html>
という表記になります

この方法だと、どこに「static_local」を作っても、全てまとめて読み込んでくれます。
Djangoならではの方法ですので、慣れてくるととても便利。
コード例:HTMLテンプレート
フッターのHTMLコードをご紹介します。
<footer class="bg-primary">
<div id="footer-logo">
<a href="#">
<i class="bi bi-bootstrap-fill footer-logo" style="font-size: 3rem;"></i>
</a>
</div>
<div class="footer-content">
<div>
<a href="#">
プライバシーポリシー
</a>
</div>
<div>|</div>
<div>
<a href="#">
利用規約
</a>
</div>
<div>|</div>
<div>
<small>Copyright © 2021 yulikepython</small>
</div>
</div>
</footer>こちらをベースとなっているHTMLテンプレートのbodyタグ内最下部に記述しました
コード例:CSSファイル
✔static_local > css > footer.css
html {
    position: relative;
    min-height: 100%;
    padding-bottom: 200px;
    box-sizing: border-box;
  }
  footer {
    position: absolute;
    left: 0;
    bottom: 0;
    width: 100%;
    height: 200px;
  }

  #footer-logo{
    text-align:center;
    margin:40px 0;
  }

  .footer-content{
    display:flex;
    justify-content: center;
    color:white;
  }

  .footer-content div{
    margin-left:10px;
    margin-right:10px;
  }

  .footer-content a{
    color:white;
  }

  .footer-content a:hover{
    color:#f4f4f4;
  }

 .footer-logo{
      color:white;
  }
色や配置についての記述をしています。
まとめ
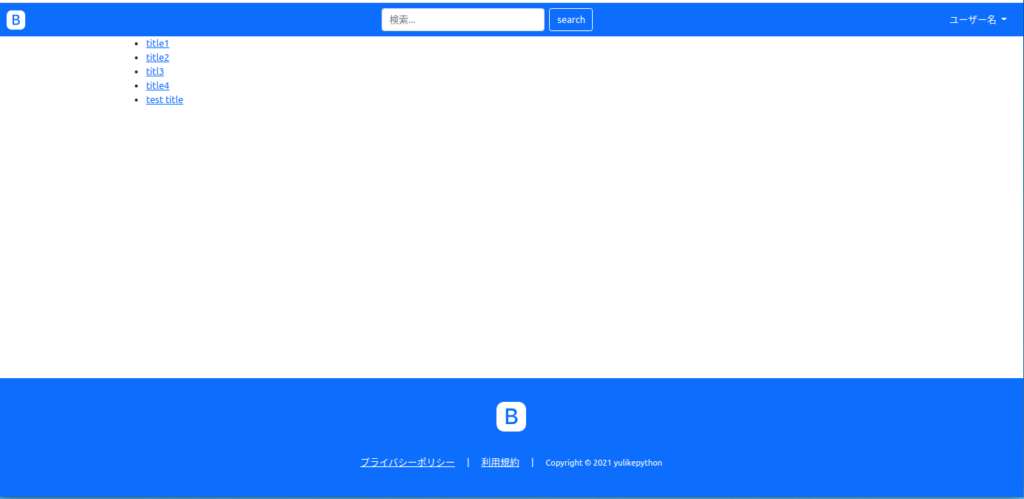
きちんと設定が完了していれば下記の通り全体が表示されるはずです。

CSSファイルを読み込むための流れとしては、こちらを覚えておきましょう。
- settings.pyでSTATICFILES_DIRSを設定する
- STATICFILES_DIRSの通り、フォルダを作成する
- HTML上でlinkタグにてstaticファイルの読み込みを行う
さて、ナビゲーションバーとフッターの記述を終えて、現状のベーステンプレートは下記のとおりです
<!doctype html>
<html lang="ja">
<head>
<meta charset="utf-8">
<meta name="viewport" content="width=device-width, initial-scale=1">
<link href="https://cdn.jsdelivr.net/npm/bootstrap@5.0.0-beta1/dist/css/bootstrap.min.css" rel="stylesheet" integrity="sha384-giJF6kkoqNQ00vy+HMDP7azOuL0xtbfIcaT9wjKHr8RbDVddVHyTfAAsrekwKmP1" crossorigin="anonymous">
<link rel="stylesheet" href="https://cdn.jsdelivr.net/npm/bootstrap-icons@1.7.1/font/bootstrap-icons.css">
{% load static %}
<link rel="stylesheet" href="{% static 'css/footer.css' %}">
<title>{% block title %}{% endblock %}</title>
</head>
<body>
<nav class="navbar navbar-dark bg-primary">
<div class="container-fluid">
<div>
<a class="navbar-brand" href="#">
<i class="bi bi-bootstrap-fill" style="font-size: 2rem;"></i>
</a>
</div>
<div class="flex-grow-1" style="max-width:500px;">
<form class="d-flex" method="GET">
<input class="form-control me-2" type="search" placeholder="検索..." aria-label="Search" name="search">
<button class="btn btn-outline-light" type="submit">search</button>
</form>
</div>
<div class="text-light nav-item dropdown">
<a class="nav-link dropdown-toggle text-light" href="#" id="navbarDropdown" role="button" data-bs-toggle="dropdown" aria-expanded="false">
ユーザー名
</a>
<ul class="dropdown-menu" aria-labelledby="navbarDropdown">
<li><a class="dropdown-item" href="#">アカウント設定</a></li>
<li><hr class="dropdown-divider"></li>
<li><a class="dropdown-item" href="#">ログアウト</a></li>
</ul>
</div>
</div>
</nav>
{% block content %}{% endblock %}
<footer class="bg-primary">
<div id="footer-logo">
<a href="#">
<i class="bi bi-bootstrap-fill footer-logo" style="font-size: 3rem;"></i>
</div>
</a>
<div class="footer-content">
<div>
<a href="#">
プライバシーポリシー
</a>
</div>
<div>|</div>
<div>
<a href="#">
利用規約
</a>
</div>
<div>|</div>
<div>
<small>Copyright © 2021 yulikepython</small>
</div>
</div>
</footer>
<script src="https://cdn.jsdelivr.net/npm/bootstrap@5.0.0-beta1/dist/js/bootstrap.bundle.min.js" integrity="sha384-ygbV9kiqUc6oa4msXn9868pTtWMgiQaeYH7/t7LECLbyPA2x65Kgf80OJFdroafW" crossorigin="anonymous"></script>
</body>
</html>これだと今後「フッターを編集しよう!」となった時もどこに何が書いてあるかわかりにくそうですね。
実はDjangoでは、別ファイルのコードを必要な個所で読み込むことが可能です
次回は、ファイルを分割し、読み込む方法「includeタグ」について解説します。


