(最終更新月:2022年3月)
✓Django初心者向けに、こんな考え・お悩みを解決します
「django-filterの使い方が知りたい!」
「とはいっても、新しいライブラリを使うよりも、普通のfilterのほうが良いのかな?」
「一覧ページでフィルター機能を実装したい!」
✓当記事を通じて、下記を徹底解説します
- 誰でもわかる!django-filterの導入方法・書き方
- django-filterとは?filterメソッドとここが違う!
- 機能実装例
誰でもわかる!django-filterの導入方法、使い方

django-filterの導入
仮想環境を立ち上げて、pipを使いインストールします。
pip install django-filtersettings.pyへ以下を追記します。
INSTALLED_APPS = [
    ...
    'django_filters',
]
django-filtersの使い方
アプリフォルダ内に、filters.pyという新たなファイルを作り、そこでフィルタークラスを作成します。
アプリフォルダ > filters.py
import django_filters
#モデルクラスのインポート

class クラス名(django_filters.FilterSet):
    class Meta:
        model = モデル名
        fields = [
                "モデルフィールド1",
                "モデルフィールド2"
                ]
フォームクラスと非常に似ています。
リストビューでは、新たなコンテキスト「filter」へ、以下の通り値を格納します。
アプリフォルダ > views.py
from .filters import 作成したフィルター

class リストビュー(ListView):
    ...

    def get_context_data(self, *args, **kwargs):
        ctx = super().get_context_data(*args, **kwargs)
        ctx["filter"] = 作成したフィルター(self.request.GET, queryset=self.get_queryset())
        return ctx
テンプレート内では、コンテキストで渡された「filter」を使って、以下の2つをおこないます。
templates > テンプレート.html
①フィルターフォームの表示
{{ filter.form.as_p }}②フィルター結果の表示
フィルターを表示するクエリセットは、以下のようにして表示します。
{% for obj in filter.qs %}

{% endfor %}
django-filterとは?filterメソッドとの違い
django-filterを使うと、短いコードでfilter機能が実装できます
django-filterでは適用するフィールドの数に関わらず、3つのステップで完了します。
- フィルタークラスの作成(filters.py)
- フィルターの受け渡し(views.py)
- フィルターの展開(.htmlファイル)
日報アプリを例にとると、以下のような値によりフィルターを作れます。
- ユーザー別
- 公開・非公開
- 公開日時
django-filterを使わないと、フィルターをおこないたい各フィールドで、以下を繰り返し記述しなければなりません。
- フォームを作成
- 値を受け取る
- フィルタメソッドでソートする
- QuerySetを渡す
django-filterライブラリはそんなフォーム作成の手間から、値を受け取りソートする機能まであっという間に構築してくれるのが良いところです。
フィルター機能実装事例
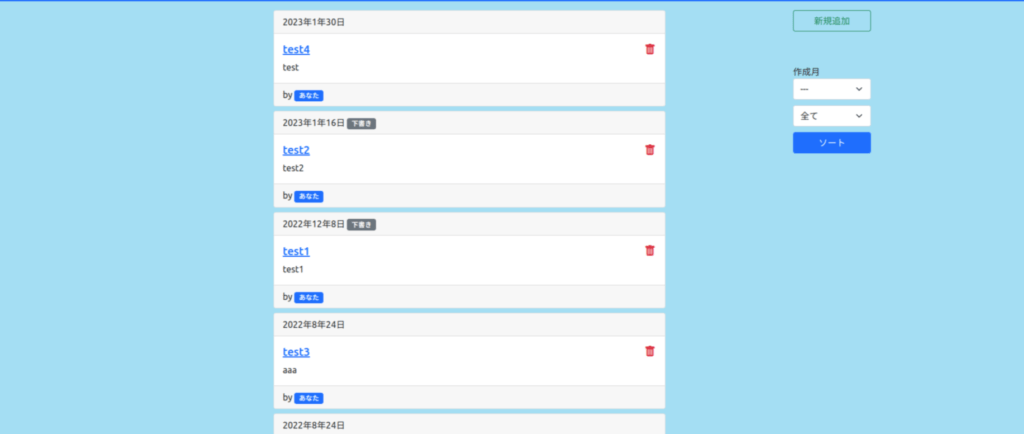
日報アプリでの一例として、いくつかのフィルターを作成し、最終的には以下のようにしました。

ご参考になれば幸いです
nippo > filters.py
import django_filters
from nippo.models import NippoModel
from django.forms.widgets import Select

public_choices = ((0, "全て"), (1, "公開済のみ"), (2, "ドラフトのみ"))

class NippoModelFilter(django_filters.FilterSet):
    #公開・非公開を入力
    public = django_filters.TypedChoiceFilter(
                        choices=public_choices,
                        method="public_chosen",
                        label="公開済み・下書き",
                        widget=Select(attrs={
                                "class":"form-select"
                                    }))
    #年月日によるもの
    date = django_filters.TypedChoiceFilter(
                method="timestamp_checker",
                label="作成月",
                widget=Select(attrs={
                    "class":"form-select"
                }))

    class Meta:
        model = NippoModel
        fields = ["date", "public"]

    def __init__(self, *args, **kwargs):
        qs = kwargs["queryset"]
        choice_option = [(obj.date.year, obj.date.month) for obj in qs]
        choice_option = list(set(choice_option))
        choice_option.sort(reverse=True)
        DATE_OPTIONS = [
            ((year, month), f"{year}年{month}月") for year, month in choice_option
            ]
        DATE_OPTIONS.insert(0, (None, "---"))
        self.base_filters["date"].extra["choices"] = DATE_OPTIONS
        super().__init__(*args, **kwargs)

    def timestamp_checker(self, queryset, name, value):
        qs = queryset
        if value is not None:
            year, month = eval(value)
            print(year, month)
            qs = queryset.filter(date__year=year).filter(date__month=month)
        return qs

    def public_chosen(self, queryset, name, value):
        qs = queryset
        if value == "1":
            qs = qs.filter(public=True)
        elif value == "2":
            qs = qs.filter(public=False)
        return qs
Bootstrapクラスをwidget内のattrsで設定しています。
widget=Select(attrs={
        "class":"form-select"
    })
dateフィルターについては、動的に選択肢を入れていかなければなりません。
なぜなら、公開している日報の日付けが選択肢となるからです。
方法は、Formクラスでの方法と同様、__init__メソッド内でchoicesへ値を入れている箇所になります。
def __init__(self, *args, **kwargs):
    qs = kwargs["queryset"]
    choice_option = [(obj.date.year, obj.date.month) for obj in qs]
    choice_option = list(set(choice_option))
    choice_option.sort(reverse=True)
    DATE_OPTIONS = [
        ((year, month), f"{year}年{month}月") for year, month in choice_option
              ]
    DATE_OPTIONS.insert(0, (None, "---"))
    self.base_filters["date"].extra["choices"] = DATE_OPTIONS
    super().__init__(*args, **kwargs)
ポイントは以下のとおり。
- kwargs内の「queryset」を使用していること
- 内包表記、set、sortを使い選択肢タプルを作成していること
- 選択肢の最初を「—」としていること
nippo > views.py
views.pyでは、作成したフィルターをインポートしたうえで、リストビューのget_context_dataメソッドへ以下を記述します。
def get_context_data(self, **kwargs):
    ctx = super().get_context_data(**kwargs)
    ctx["filter"] = NippoModelFilter(self.request.GET, queryset=self.get_queryset())
    return ctx
※リストビュー内一部抜粋
nippo > templates > nippo > nippo-filter.html
フィルタの部分は別ファイルで保存します。
<div class="px-2 filter-container">
    {% if request.user.is_authenticated %}
        <div class="filter-add-btn"">
            <a href={% url "nippo-create" %} class="btn btn-outline-success w-100 from-control">
                新規追加
            </a>
        </div>
    {% endif %}
    <form method="GET">
        <div class="flex-sort">
            <div class="w-100">
                {{ filter.form.date.label }} {{ filter.form.date}}
            </div>
            {% if request.user.is_authenticated %}
                <div class="w-100">
                    {{ filter.form.public.label }}{{ filter.form.public }}
                </div>
            {% endif %}
            <button type="submit" class="btn btn-primary form-control">ソート</button>
        </div>
    </form>
</div>
nippo > temlates > nippo > nippo-list.html
Bootstrapのクラスなどで、フレックスボックスを使っています。
{% extends "base.html" %}
{% block head_title %}日報アプリ一覧{% endblock %}

{% block content %}
  <div class="container d-flex justify-content-center flex-wrap-reverse py-3">
    <div class="flex-grow-1"><!-- 一覧リストdi-->
        {% if filter.qs %}
            {% for obj in filter.qs %}
                <div class="card mx-auto mb-2" style="max-width:700px; min-width:300px;">
                    <div class="card-header">
                        {{ obj.date|date:"Y年n年j日" }}
                        {% if not obj.public %}
                            <span class="badge bg-secondary">下書き</span>
                        {% endif %}
                    </div>
                    <div class="card-body">
                        <h5 class="card-title">
                        {% if obj.user == request.user %}
                            <span class="float-end text-danger" data-bs-toggle="modal" data-bs-target="#deleteModal-{{obj.slug}}">
                                <i class="bi bi-trash-fill"></i>
                            </span>
                                <a href={% url "nippo-update" obj.slug %}>
                        {% else %}
                            <a href={% url 'nippo-detail' obj.slug %}>
                        {% endif %}
                                {{ obj.title }}
                            </a>
                        </h5>
                        <p class="card-text">
                            {{ obj.content }}
                        </p>
                    </div>
                    <div class="card-footer">
                        by
                        {% if obj.user == request.user %}
                            <span class="badge bg-primary">あなた</span>
                        {% else %}
                            <span class="badge bg-secondary">{{ obj.user.profile.username }}</span>
                        {% endif %}
                    </div>
                </div>
                {% include "nippo/nippo-delete.html" with object=obj %}
            {% endfor %}
        {% else %}
            <div>表示する日報がありません。</div>
        {% endif %}
    </div><!-- 一覧リストdiv終了-->
    <!-- 右側を表示する -->
    {% include 'nippo/nippo-filter.html' %}
  </div>
{% endblock %}
フィルター表示の部分はこちらです。
{% if filter.qs %}
  <h2>日報一覧</h2>
  {% for obj in filter.qs %}
    <div>ここに表示します</div>
  {% endfor %}
{% else %}
   <div class="nippo-none">保存されている日報はありません</div>
{% endif %}
CSSなどの調整
フィルターには直接関係ないものの、CSSを整えるための調整を以下のファイルでおこなっています。
static_local > filter.css
filterテンプレートをレスポンシブ対応にするための調整です。
.filter-add-btn{
    margin-bottom: 60px;
}

.flex-sort{
    width:100%;
    display: flex;
    flex-direction: column;
    justify-content: center;
    align-items: center;
}

.flex-sort div{
    margin-bottom:10px;
}

@media screen and (max-width:767px){
    .filter-container{
        width:100%;
        margin-bottom:20px;
    }
    .filter-add-btn{
        margin-bottom: 10px;
    }
    .flex-sort{
        flex-direction: row;
        align-items: flex-end;
    }
    .flex-sort div{
        margin:0 10px;;
    }
}
static_local > footer.css
こちらはフィルターには関係ありません。
フッターの位置を調整するために修正を加えました。
html {
    box-sizing: border-box;
    position:relative;
  }
body{
  min-height:100vh;
  position:relative;
  padding-bottom:200px;
}
footer {
  position: absolute;
  left: 0;
  bottom: 0;
  width: 100%;
  height: 200px;
}

#footer-logo{
  text-align:center;
  margin:40px 0;
}

.footer-content{
  display:flex;
  justify-content: center;
  color:white;
}

.footer-content div{
  margin-left:10px;
  margin-right:10px;
}

.footer-content a{
  color:white;
}

.footer-content a:hover{
  color:#f4f4f4;
}

.footer-logo{
    color:white;
}
templates > css.html
こちらを追加しましょう。
<link rel="stylesheet" href="{% static 'css/filter.css' %}">まとめ
django-filterを使うことで、フィルター機能がカンタンに実装できました
導入方法は、pipを使ってインストール、INSTALLED_APPSへの追記の2点
使い方は、Filterクラスの作成、filterの受け渡しと展開の3ステップ
とおさえておきましょう。
また補足として覚えておくことは以下のとおり。
✔Bootstrapクラスを適用する方法
フィルター名(widget=ウィジット名(attrs={“class”: クラス名}))
✔動的にchoicesを操作する方法
self.base_filters[フィールド名].extra[“choices”]
チュートリアルで進めている方は、以下にて、ユーザー別のページを作成する方法とその実例コードを見ていきましょう。


